-->
SCRAPBOOK HEAVEN

Sunday, August 14, 2011

This shows the wing in a down position revealing the Dragon lettering

I'm quite please at how this turned out. I spent many hours on this and it was well worth it

Using my coluzzle I cut out my letters on clear acrylic. I inked the acrylic with Tim Holtz alcohol ink before I cut them. I wanted it see through so you can see the castle tops in the background

Swotd detail. Cut out if metallic paper. I placed red stones for detail. I cut a slit on either side of his hand and slid the sword under it

This is the finished shield. I'm so proud at how it turned out. I used a lot of glossy accents by Inkessentials

The shield is made from metallic silver paper. I found a shield shape I liked under google images. Printed out the size I wanted traced it and cut it out. To add dimension I traced and cut out a border and added silver brads

This is our family Coat of Arms. I found it on the Internet taped a piece of clear acrylic over my computer screen and colored it with permanent marker. This will go on Daltons shield for his scrapbook page

Friday, August 5, 2011

Completed tongue and flames

I printed out a picture of a flame thrower and taped a piece of clear acrylic on top then used my puff paints to paint on the flames. Very easy to do. I just made small circles and copied the color below
So using these two colors I made my flames. If you make the circles in one spot these two colors will make orange.

Dragon paper piece for scrapbook page

The wings bend downward to cover his picture. It will need to be lifted to view the picture

Here is my dragon I made for my sons scrapbook page. I'm not good at posting tutorials but I did my best. However, you will need to go to the end of my posts and work forward. Sorry. I'm awful at computers

I added a beard. You can see the nose I placed. The teeth are ok but I did not know what else to do. It is such a small thing and tedious

I attached the head using thin pop dots. 

I realized the nose was not on his face. So I made it. The picture is blurry but you can tell that I cut a piece of red and black paper to make it. I used my white gel pen for the highlight now I gotta glue that on

This is the second wing that goes behind the dragon. As you can tell I did not need a complete wing as not much will be seen I highlighted using the same technique as the other wing

Finished product

I cream chalked the wings for deminsion. Then I used my Inkssentials white opaque pen for high lights

Third and final fiber layer

I glued it right under the first layer. I noticed this fiber laid one way so when  I got to the back I had to snip it and turn it the other way so it would lay naturally

This is my second layer. You can't tell but it's a little more shimmery

Almost done with this wing. Gotta shade it with my chalk and creams

This is the first of three layers of fiber to make up his back

I love these fibers!! I'm using them for his back

This is a closeup look at the patterned paper I used and the pearl puff paint claws

Here is the face. I'm still working on the teeth. Having a difficult time. I put a rhinestone for his eye. I cut a slit out and glued it behind that so it will have some inset dimension 

So here is some of the dragon I've already glued together. The wings and face are next. I've added my first layer of fibers for the back by hot glueing it on

Wednesday, August 3, 2011

DRAGON PAPER PIECE

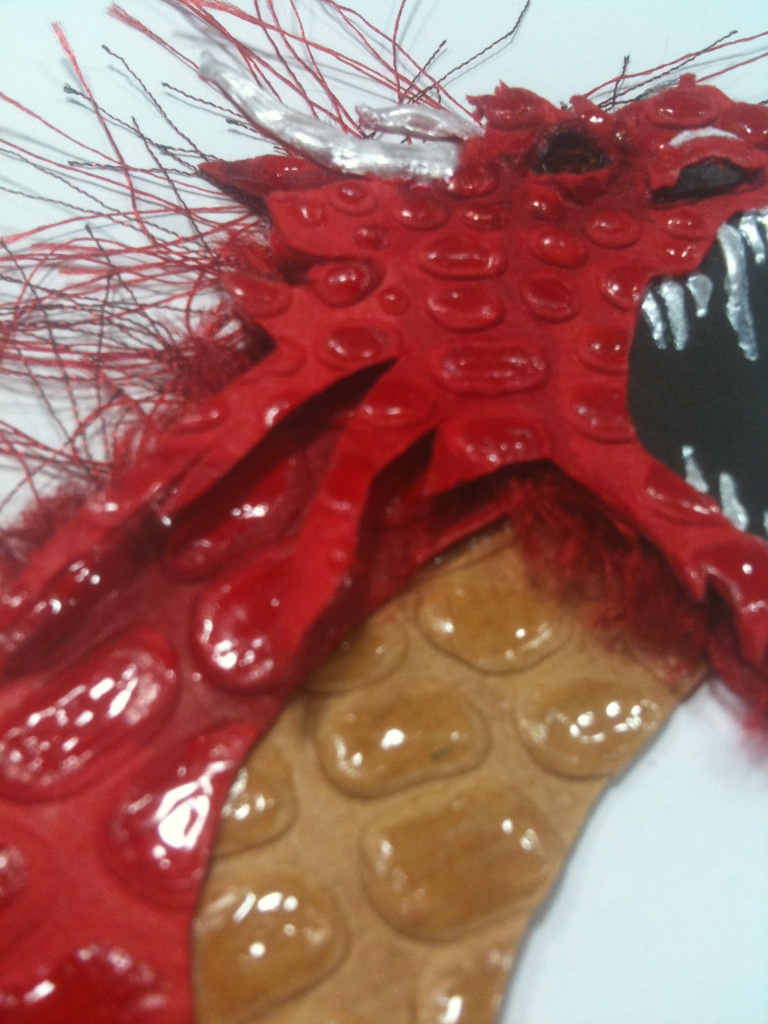
So I decided to scrapbook one of my son's school pictures. This one has a white background and he is sitting on the floor. All I can see is his red tshirt. I had no idea how I was going to scrapbook this photo. One day I was looking at his shirt and saw little dragons on it. AHA! I'll do a dragon slayer theme. Since then I have been looking for a dragon to paper piece. I have those wonderful Paper Studio textured papers that I thought would make an awesome dragon. I could not find the dragon I wanted. I looked everywhere like google,clipart,svg,images etc. I decided to save some of the dragons I liked and combine them into one. I used the wings of one, face of another and body of another. Printed them out on my printer and then taped the body parts together. I traced the image onto a piece of white cardstock then cut that out. I used that for my template as the cardstock is heavy duty unlike typing paper. It was a little difficult tracing and cutting the textured paper but well worth the effort.  I'm trying to make it 3D like so I'm layering as much as I can. I used the red and tan textured papers. I had some diffuculty with the tail but it will do. I wanted the wings to look as realistic as possible so I used transparent vellum.

Last night I glued on as many pieces as I could. I used Tulip pearl puff paint for the claws of the wings,hands and feet. Since the dragons wing will bend down to cover my sons picture I had to make the wing 2 sided so I had to have 2 wing templates. When you open the album to view the page you will have to lift up the wing to reveal his picture. Tonight I will do the claws on the other side of the wing. Oops I need to do the other wing too. Oh well. I'll have to do that tonight as well. I just gotta figure out how to do the teeth. I will probably do it in the Tulip pearl paint as well. Just a little scared I  might mess it up. I  will try to use a small thin brush and paint it on there. This has been fun so far. Can't wait to finish it and post the completed picture.  Oh and I'm bad at not saving my templates. I end up cutting them up for smaller layering templates....my bad? I suppose if anyone wants it I could reproduce it. Just let me know.
Blessings to everyone!