-->
SCRAPBOOK HEAVEN

Monday, January 24, 2011

Valentine Box

I made these little boxes for the kids to decorate for cupid. It was very easy and quick as you can tell looking at the pictures. I have not decorated it yet but still thought I would post it for you to see. I traced the image with tracing paper onto red Bazille paper then cut it out. You might want to use a heavy cardstock for durability.  I scored the paper for easy folding. Then glued it together. Soooo easy. I was thinking of adding a ribbon handle and we could hang then. I tried to make it into an SVG but I'm not that talented enough yet to do that. I did try though. If somebody does convert to SVG please send me a copy. Thx and blessings.


Sunday, January 23, 2011

HERE COMES CUPID!!

Every year cupid comes to visit us. Starting February 1st cupid visits nightly and leaves a little gift for the kids. This year we will be making a heart box for cupid to leave the gifts in. The kids get to decorate thier own box.  You can find the template here http://rubberstamping.about.com/od/templates/ss/Free-Heart-Box-Template.htm I enlarged the box as big as I could and printed it out. I have not started making them yet but when I get finished I will post the pictures. Cupid usually leaves candy, socks, pens, pencils, hair accessories ect. or whateve will fit into the heart box.

Purse and Picture frame present

Now here is a project I did for my daughters friend's birthday present. We went to Hobby Lobby and bought a black picture frame. She had a pic of both of them so I copied it on the printer in black and white and printed BFF under it. I put purple stickles on the BFF and place a sticker crown on one of the girls. I glued it onto a piece of homemade purple paper and added rhinestones to one side. I put a bow on the picture frame in purple and hung an embelishement from the bow.  I got the embelishement at our local grocery store. It was a pair of earrings. I thought they were ugly but knew I could use them for something else. Could not beat the $1 price tag. I placed a Chandalier that was cut out on my cricut on the front of the frame.
The next thing we did was make a purse to hold some money we were giving her. The template is here http://www.acherryontop.com/articles/Paper-Purse-Class-661.  Her bedroom theme is purple so that is why we chose that color. I got the purple paper at Hobby Lobby. It looks like alligator skin. I love the texture of this paper.  Perfect for a purse. The inside paper was also purchased at Hobby Lobby. Once again I had purchased the purple flower at our local grocery store. It was a hair piece. Not no more.  As you can see by the pictures the back of the purse was secured by brads.  The front flap is held in place by velcro. This was a fun project for me and my daughter to do together.


For the side of the purse I once again used some parts from earrings and put them together on a chain with some extra embelishements I had.

Thanksgiving Banner


I wanted to share  a project I did for Thanksgiving. I know it is a little late but with the activities going on around here you would understand. I think I got the banner from Penny Duncan Creations. I really love her blog. She has lots of awesome SVG's and they are FREE! I made copies of our family's faces in black and white cut them to match the banner then embelished.  This was fun. It turned out really great. The kids enjoyed seeing their picture hung up. Blessings, Susan

Friday, January 14, 2011

Card, Scrapbook page combo

I think what I am going to make next is a card-scrapbook page combo. My idea is to save the cards I get and put them in my scrapbook. I have a card my husband bought just before his surgery. I usually throw them away....I know, I know I shouldn't but I do. I just don't know what to do with them all. Anyhoo... I thought I would dedicate a page to my husband and put his card in there. In the future I will try to incorporate cards with pages. There are lots of pop up cards I have downloaded that I want to use in my scrapbook pages. I'm learning.

Monday, January 10, 2011

I must confess

Ok here it goes...I confess......I throw away my cards that people give me!!....ok it's out there...whew. That is why I don't make cards because I put a lot of work into my stuff and to give it to someone to throw away is a waste. Now I'm not saying everybody throws cards away or that I'm the only one, but still....that is why I enjoy scrapbooking so much. They will be handed down to my kids with memories.  Now that I have confessed that, I am making a card for all my friends who have helped Frank and I through this tough time.  I do plan on putting lots of time and love into these cards. I also have Mrs. Penny Duncan helping me. yay!!  Maybe this will convert me...I don't know.
Blessings,
Susan

Saturday, January 8, 2011

My Husband

He did good last night. He has pericarditis now but they are treating that with antibiotics. WOW is it hard to stay strong. Sometimes I just want to burst into tears seeing him in this pain. I feel so helpless. I know the good Lord has it under control. Blessings everyone,
Susan

Friday, January 7, 2011

It's the small things

As I sit here at St. Lukes Hospital looking at my husband who just had major heart surgery, I realize what a wonderful God we have. Thanks to all the prayers and God's wonderful work he did well. His recovery will be painful and long but I know he is strong. Strong in God and strong willed.
     I did not make the design team. I am happy for the ones who did. They deserve every bit of the glory. Awesome job and good luck. I will have to work harder on my scrapbooking...darn it.....he he I love it!!!!
     I will not be posting any projects because I'm here at the hospital...duh... he he.... anyway blessings to you all,
Susan

Wednesday, January 5, 2011

My Pink Stamper Design Team Submission

So My Pink Stamper Design Team is looking for another designer. All I have to do is:
* have a blog
* cannot already be serving on a DT that has product that is a conflict of interest (most DTs are just fine as long as they do not sell product that is similar to My Pink Stamper Original Cricut Stamps idea)
* project must be made just for this challenge
*Post a pic on my blog with a full recipe along with what the challenge is about
*This needs to be a new project that I made just for this challenge
*Only one entry per person.
*I must have either a Cricut or Imagine to serve on the team
*No experience necessary but I must have a love for the craft!  :)

Challenge:  Make a card, scrapbook page, or other Cricut project with your favorite cartridge using her favorite colors......

Pink
Green
Brown
(other optional color of my choice)
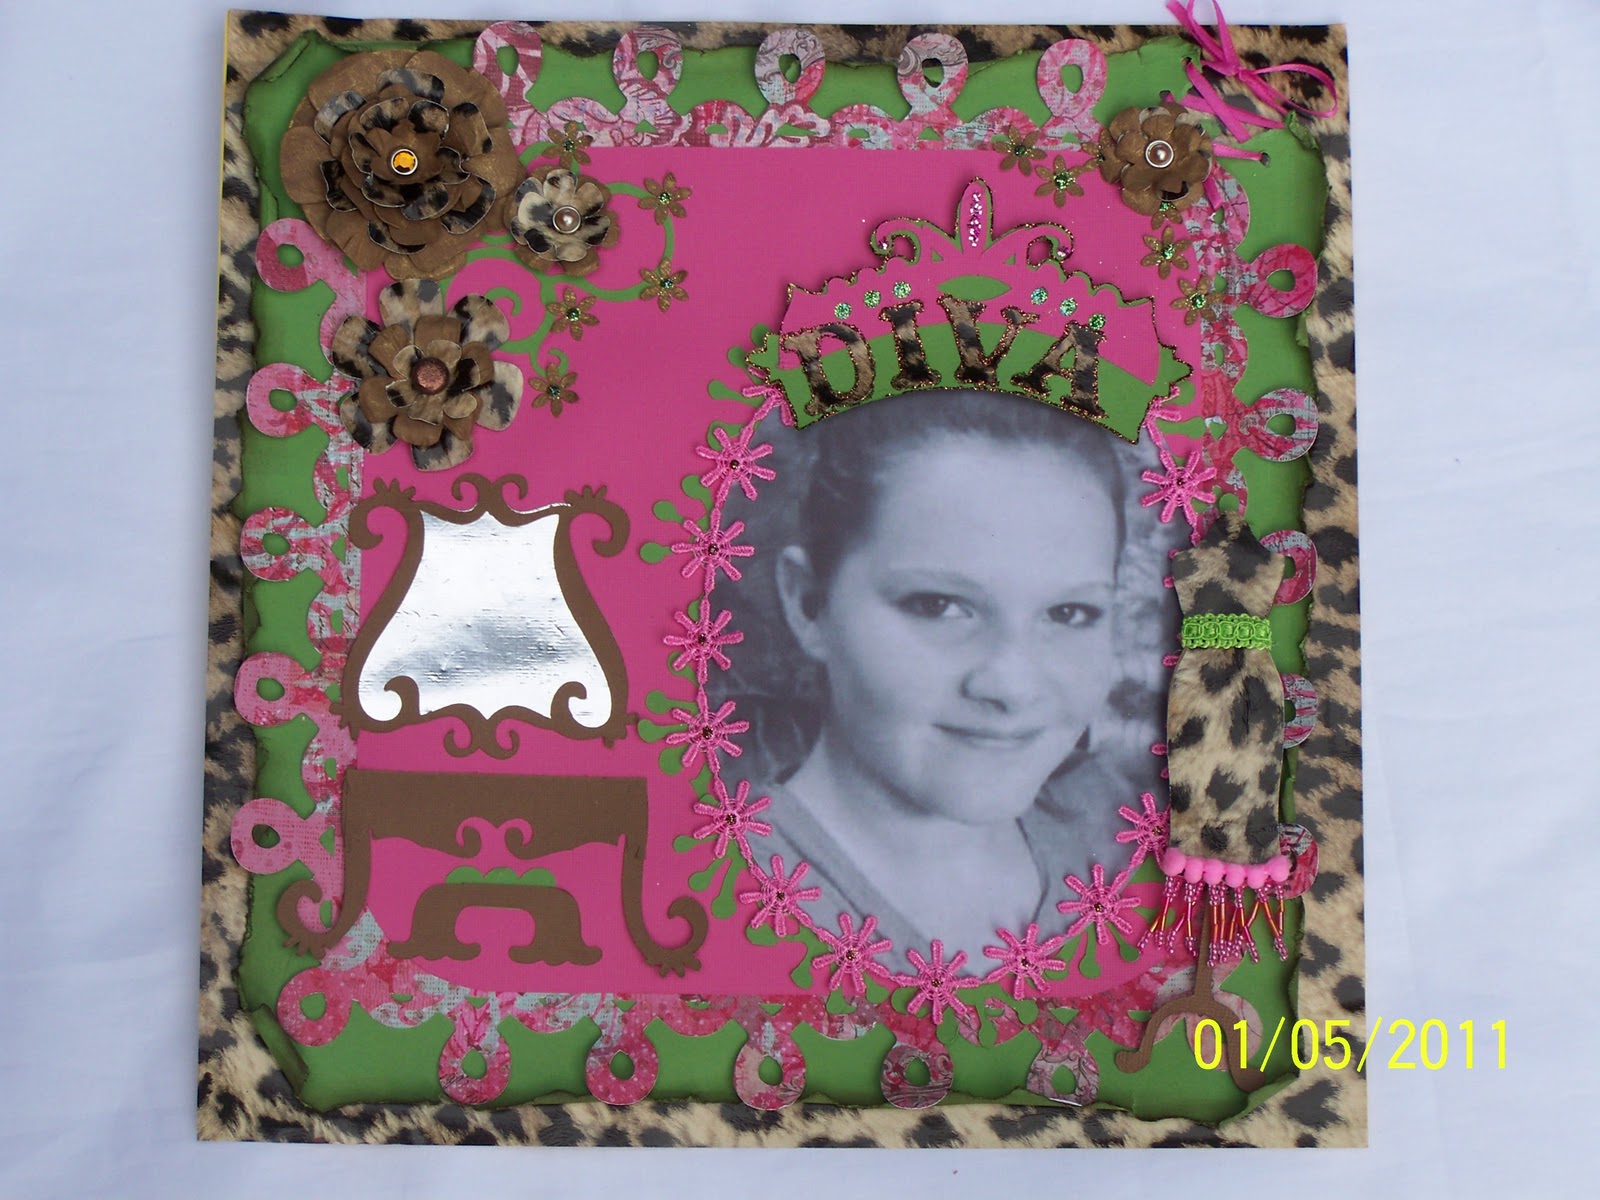
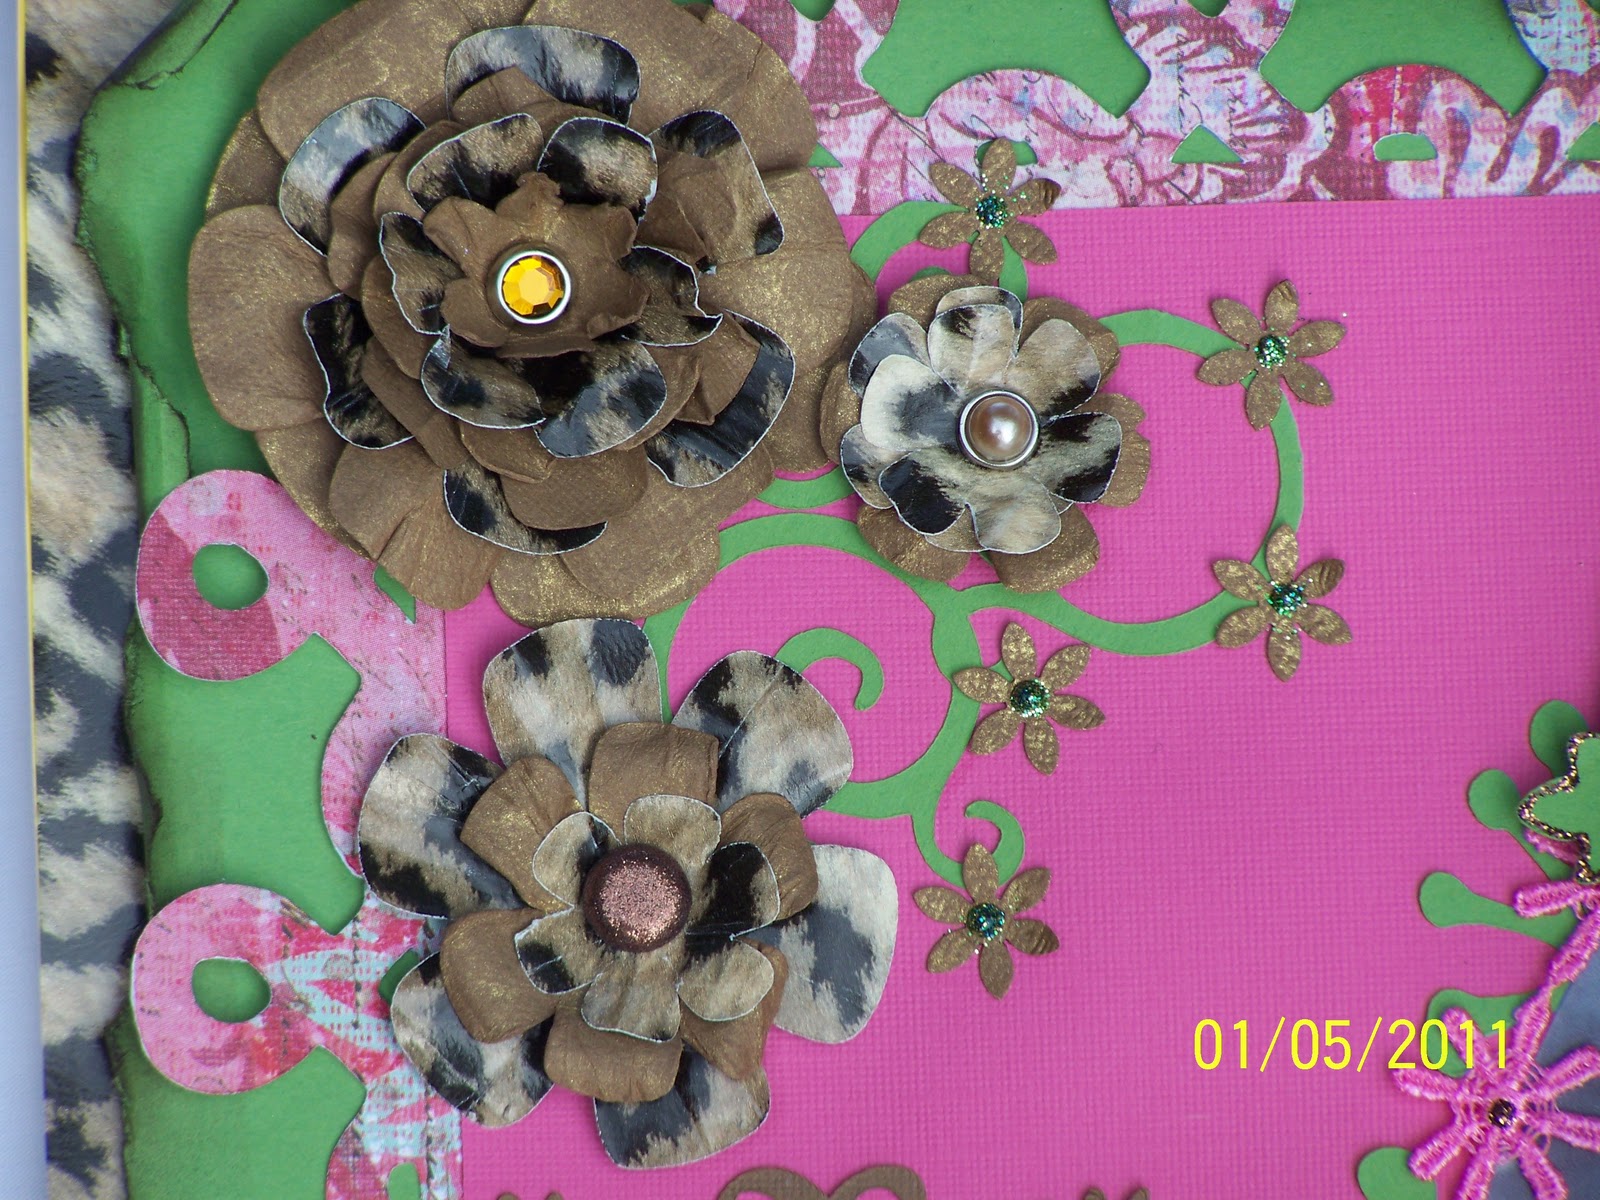
Well this was quite an experience for me as I have never entered into a contest of this magnitude before.  As I looked at all the other entries I found that there are a lot of card entries but not many scrapbook page entries. I did a scrapbook page because I love to scrapbook, however, I am getting into card making. I love the colors she chose. The difficult decision for me was picking which embellishments I wanted. I have so many choices.  I use Storybook a lot. I love all the design embellishments.  I like to use the cuts for different things other than what they were designed for. Like the mirror I made. I used the negative portion to make a vanity table and the stool was made out of a bracket. You just have to look at things differently and have an open mind.  I hope this is noticed in my work.  I enjoyed the challenge!! Wish me luck!!
Here is my recipe. I tried to get as detailed as I could.
Recipe:
Storybook cartridge and Plantin school book for flowers only.
1 sheet of 12 x12 inch animal print paper cut into a 1½ inch border square frame
1 sheet of 12x12 inch Jubilee pink and blue ornate paper K&C Company with a decorative punch around the page border.
1 sheet of 12x12 inch green cardstock with all 4 edges torn and edges distressed with Walnut stain distress ink and curled
1 sheet of 8½ x 9 inch pink cardstock
1 sheet scrap brown cardstock
1 sheet of 12x12 inch cardstock any color
1 sheet of 4x4 inch metallic silver paper or aluminum foil
2 inches Next Style pink beaded fringe
2 inches small pom pom ribbon
Tim Holtz Walnut stain distress ink
Cinnamon stickles
Green stickles
Gold Glimmer mist 
With the animal print paper cut a square hole in the middle leaving a 1½ inch frame. Remove the inner square to be used later. Glue animal print frame onto cardstock of any color (it will be covered up so the color does not matter).  Tear green cardstock around all 4 edges then distress with walnut distress ink. Curl edges inward using handle of small paint brush. Center and glue on top of animal print paper. Use your favorite punch around the page and punch the K&C Company paper and glue into center of green cardstock. Glue pink cardstock in center of K&C paper. With the storybook cartridge cut out 2- 3 inch mirror using pg.48 accent/frame in brown and 1 accent blackout in silver. I did not have any silver so I glued aluminum foil onto scrap cardstock then cut out my design. I used the extra brown accent/frame to make the vanity legs and the negative top portion of the mirror for the vanity table top. For the stool on pg. 64 I cut a 2 inch shorty/holes. The cushion is on pg 47 accent blackout. I cut out a 3 inch scalloped square and used only 3 of the scallops for the cushion. I can’t remember where I got the dress form pattern from but they can be downloaded just about anywhere on the images internet and traced onto paper. The fringe and pink pom poms were placed at the bottom of the dress and a green ribbon belt was placed at the waist line and pop dotted onto page.  DIVA was cut out in animal print 1 inch shorty holes and glued on top of crown and outlined in cinnamon stickles. Green layer is 2¾ inch shadow and pink layer is 2¾ accent/frame on pg. 65. I accented the crown with pink and green stickles and outlined it in the cinnamon stickles it was pop dotted up on the page.  I cut out her black and white picture in an oval shape. I then cut out 8-2 inch dandilions. They were cut in half and glued around her picture. On top of that I placed the pink flower trim by Making Memories called cheeky trims. In the center of each flower I used cinnamon stickles.  The flowers were cut from Plantin Schoolbook  pg. 76 in shadow, sizes from 1, 1½, and 2 inch using the brown and animal print papers.  The brown flowers were sprayed with Gold Glimmer Mist.  I used various brad center pieces from Paper Studios. The green vines were cut from Story book pg. 60 size 3inches and placed under the flowers. I used a punch for the smaller flowers and put green stickles in the center and sprayed with Gold Glimmer Mist.  I hope you enjoy as much as I  enjoyed making it. Thx and blessings.

Pink scrapbook pages

 I had so much fun doing these scrapbook pages. I try to get as many pictures on one page as I can and not destroy the design. I've come up with all kinds of ways. On this one I tucked a picture behind a pocket picture and then I have a flip up picture.  Once again since I hate my handwriting I wrote on the back of the photo that is in the pocket.  I love these colors. The pink paper I used has great texture to it. I got it at Hobby Lobby but can't remember who makes it. This is my oldest daughter. She was sitting on the couch and had just taken off her shoes. She was taking pictures of her self and being silly. I thought it turned out great.

Tuesday, January 4, 2011

WOW

My husband is glowing with the healing prayers. Thank you all for praying for my husband. Surgery is Thursday....we are so ready to get this over with.  In between worrying about him I'm trying to finish my first entry into a contest. If I win I will be one of the designers for The Pink Stamper. I hope I get chosen. I really enjoy experimenting with different textures and media. I have not made any cards but I'm currently working on that now. I need a lot of thank you cards for my husband. We have had a huge outreach of help.  God is good and faithful.  Hopefully my next post will be the scrapbook page entry. Blessings, Susan

Sunday, January 2, 2011

Yay for Penny Duncan!!!

I love her blog....soooo glad she is still going to post stuff. I pray her year goes better than what it has. Please visit her site (http://pennyduncancreations.blogspot.com/) as she has beautiful stuff and sooo creative. Oh and Lookie...I have one follower!!! It's Penny Yay!!!
blessings,
Susan

Please forgive me

My photography is from my iphone. I'm not very good right now. Just give me some time to experiment and I will have better pictures.

Scrapbook pages continued


Huh....well when I pull up the pictures they show upright. Oh well learning process. Any hoo...the next one is just a detailed picuture of a brown fabric flower I folded in half and placed a decorative metal piece on it to turn it into a bud. I love the lacing effect...learned that from Gabriella Pollaco.
I love the butterfly here. I used a key brad for the center and added some rhinestone dots. I think on this one I made a copy on my priter of some music and then cut out the butterfly sprayed with Glimmer mist then did the edges with chalk.

Here are some scrapbook pages I've done.

Well here I go. I'm going to try to download some pictures and tell you how I did them. I will try to remember where and what I got but it has been a while so I probably don't remember much. Mental note...write down where you got stuff....So my first picture here is of my daughter in her Halloween outfit. She was being silly and I snapped her picture.I used my cricut to cut out the bees,letters and the black borders. I used black glitter paper. I used the negative to the scallop frame for the picture on the bottom. I love hanging jewels off of stuff so I put it on the flower.

Ok that went well now lets see if I can do the next photo on here. This one is the sandpile one I was working on. It was challenging as I like to put as many pictures on one page as I can. I used my cricut to cut the bird cage.
oops...it's sideways...well suppose I need to tweak my photos before posting...let me go do that before I post anymore.

Saturday, January 1, 2011

Love these flowers

http://gabriellepollacco.blogspot.com/2010/08/flower-tutorial-making-water-distressed.html  I'm trying to perfect my flowers. I love the way these look. I've made them on the Picture with Larry and Payton. They are super easy to make and look very pretty. Cheaper than store bought that's for sure.

HAPPY NEW YEAR

I hope this year brings you joy and happiness and a new found love in Christ our Lord!! Well it has been some time since I've posted anything. I'm a little slow with the blog thingy since I'm new to this stuff. I've done several projects that I want to post just need to take the time to do it. I have been busy though. My husband, Frank, has an aortic aneurysm and will be having open heart surgery. He will get a new valve and aorta. Major, major surgery. We are scared but we both know that God has it under control.
I'm thinking about entering a contest and I'm scared to do that too. It's not the art work it's this computer stuff....I tell myself, one day at a time, one day at a time. Well suppose I will pray for wisdom.
Blessings to you all,
Susan